Wikipedia Paragraphs to Google Sheet Columns

I am in the process of evaluating some Robotic Simulation software.  The first part of the process is to create a list of software to evaluate.  Wikipedia offers a good starting point with a list of package names, urls, and descriptions.  But what I want to do is to put this in a Google Sheet and add additional columns to it.

WikipediaListToGoogleSheet


Method 1: Copy & Paste

The first method that you might consider is copying and pasting the various components into a Google sheet.  There are 34 items in the list.  Each item contains 3 parts: package name, URL, and description.  Assuming you could copy and paste each component in less than 5 seconds, that would mean about 15 seconds per item.  all told 15 * 34 = 610 seconds.  This means about 10 minutes of work.


Method 2: Regular Expressions

Regular expressions allow for you to match pattern of strings and then to manipulate those patterns.  This allows for you to take a task above that would take 10 minutes of steady, solid, error prone work.  But there is a method that could take that same work and turn it into less than a minute of effort.  After which you will feel smart and could use the other 9 minutes to write a blog post like this.


Step 1:  Click on the Edit tab in Wikipedia:  That will let you see the Wiki Markup that looks like this:

* [http://www.parallemic.org/RoKiSim.html RoKiSim]: A free educational software for the 3D simulation of six-axis PUMA-type serial robots.
* [http://www.RoboAnalyzer.com RoboAnalyzer]: A free educational software to teach Robotics Concepts and Virtual Simulation (Joint Jogging and Cartesian Motion) using CAD models of Industrial Robots.


Step 2:  Copy and paste the wiki markup that represents the list of items and put it in NotePad++.


Step 3:  Identify what you are looking for and how you want to transform it.

You can see that each list item starts with a *.  The link and package name are in “[ ]”  And there is a semicolon that you want to get rid of.


Find this:

 * [http://www.parallemic.org/RoKiSim.html RoKiSim]: A free educational software for the 3D simulation of six-axis PUMA-type serial robots.

And replace it with (the extra spaces represent tabs… Tabs allow for us to put the information into different columns in Google Sheets):

 http://www.parallemic.org/RoKiSim.html    RoKiSim    A free educational software for the 3D simulation of six-axis PUMA-type serial robots.


Step 4: Determine the Regular Expression that you will need to search for and the replace


Find: \*\[(.*) (.*)\]

Replace: \1\t\2\t


Here is what your NotePadd++ replace dialog box should look like.  Click “Replace All”.

Screenshot 2014-11-24 10.31.30


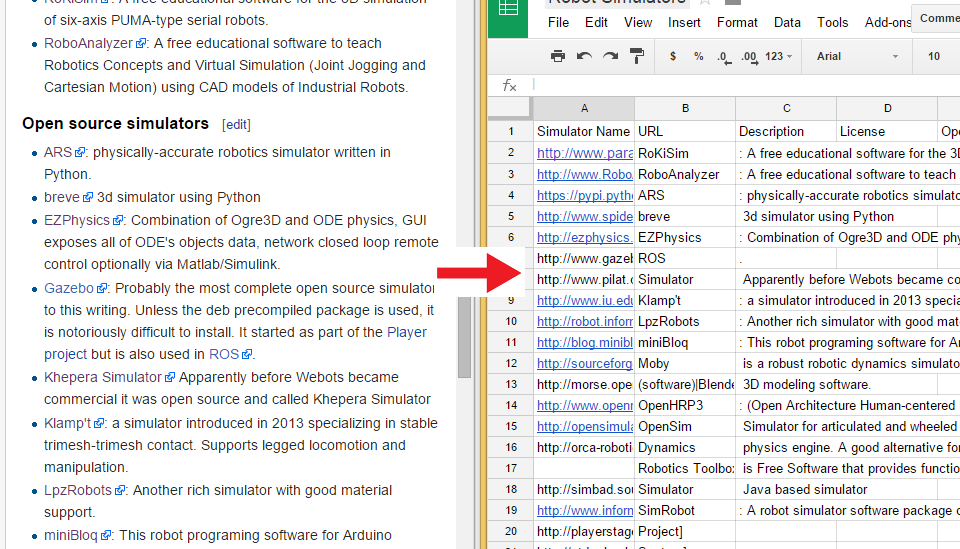
Step 5:  Copy and Paste the results into Google Sheets and you will have columns containing the URL, Name, and description.  You can then move around the columns into the order you want.


Figuring out the regular expression is going to be the most difficult part of this process.  It is a skill that is not widely mastered, and looks mysterious.  But it would be better to spending more time to master this skill and eventually be able to quickly pull this together quickly, than to waste that time doing copy and paste.

Arduino on a BreadBoard and using the MRF24J40MA ZigBee module

Two accomplishments today.  First, I was able to use the Atmel 328P chip outside of the Arduino board.  What is the benefit of this?  First, cost..  The Arduino UNO is currently $25 but the Atmel 328P is only $1,86 if you buy it on eBay, and only a few dollars more if you buy it from some place else.  However, you are going to need a few more components such as a 16MHz crystal, a few capacitors, resistors, voltage regulator, wires, and something mount it on..  All told, probably another $5.  Now you won’t have the nice board, the USB to serial converter, the 3.3volts power connection (could easily use two resistors to create a voltage divider to step the 5V down).  So it is not an apple to apple comparison.  But if you want to have these chips in a lot of little projects, then you are going to have a lot more options when the price gets to the $5-$10 range instead of the $25 range.


Also, you can compact the design down to just what you need.  You have more control over the final form factor.  And this is also a good step into the world of microcontrollers in general.  Before you know it, you will be programming the entire Atmel family of chips..


So, how to get started.  There were a number of really good tutorials that I looked through.:

arduino.cc/en/Main/Standalone

Here is the configuration I used to burn the boot loader onto the Atmel 328P.
20141118_122457
To program it I just inserted it into the Arduino, downloaded the program, and then removed the Atmel 328P.
Here is the configuration I have it to run the “Blink” Example  (This is the “hello world” of arduino)
20141118_122955
My other accomplishment today was getting the MicroChip MRF24J40MA module working with two Arduinos.  Starting out small, I have it so you can press a button on one arduino and a LED comes on the other:  (It really needs to be shown in a video.  I hope to upload one in the next few days)
20141118_164112 20141118_164119 20141118_164336 20141118_164339


Here is some more info about the module and how to use it:

Data sheet:

Information about data interface is in the datasheet for “MRF24J40 IEEE 802.15.4™ 2.4 GHz RF Transceiver

Data Sheet” (DS39776)http://ww1.microchip.com/downloads/en/DeviceDoc/39776C.pdf

Great Example of how to use it:
Now I would like to be able to combine the two above so that I only need the Atmel 328P and the MRF24J40MA module.  Then I will hook up some sensors (light, temperature, humidity, gas, accelaramotrs, etc.)  Then I plan to have some of these modules through out the house feeding data into a central unit that then is loading it into a database.  Then I will be able to see how different parameters of my house changes over time.  I think I should be able to have a working prototype up by the end of day tomorrow.

What I Learned in SolidWorks today

There is definitely a skill required to be productive in a CAD product like SolidWorks that will take some time, patience, and persistence to pick up.  Today I completed a number of tutorials, but I am a long way from being able to take a vision in my head and actually create the engineering drawings required to see a product produced.


Here are a few things that I was able to produce today:

PressurePlateModel


PressurePlateDrawingcreating a partAssemblyTutorials-list

Magic Card Scanner

My youngest son has thousands of Magic cards that he wants to scan. Instead of doing it manually, I thought it would be good to create a simple device to take a picture, move the card from the top, take a picture, etc.

Here you can see one of the early iterations of it actually working. It uses a PC cooling fan to pick up the top card. There is a light sensor on the bottom of the fan that is used to determine if the fan is in contact (and remains in contact) with the fan. There is one servo that moves it up and down, and another that moves it left and right. An arduino is used to control the fan and servos and monitor the light sensor. This is hooked up to a laptop that has a simple Python program running on it that uses the libraries from OpenCV to take the picture. The Python program communicates with the Arduino via the serial port.


Here is a video of it in action:


This was created a few weeks ago.  It took about 20 hours of experimentation, but it has scanned hundreds of cards.  There is quite a bit more work to be done on it to make it work as well as we would like.

Learning SolidWorks

My main goal for today is to be able to learn to do basic things in SolidWorks.  This is a popular CAD package that can be used for mechanical design.  I have some visions for some robotic devices, and I think the first step is to be able to get them into some tangible form.  The Artisan’s Asylum has a computer lab with SolidWorks installed.  And I have a class tonight on Analog Electronics that I have to go there for anyway.  So my plan is to buy a day pass, spend the day going through tutorials and creating some very basic physical designs.


At the present time I am on the Amtrak Downeastern to Boston, and I thought it would be good to find a few tutorials that I could work through while I’m there.  Here is what I found:


I found this “How to build a Robot” tutorial for Solidworks.   It looks to take someone from not knowing anything to doing something fairly practical: www.solidworks.com/sw/education/9959_ENU_HTML.htm


I also found a number of other tutorials and sites to check out:


www.solidworkstutorials.com/


Lynda.com has some SolidWorks courses: http://www.lynda.com/Solidworks-training-tutorials/1157-0.html  I have taken some of their online courses before, and they were all of very high quality..  It is a paid service, but really reasonable.  (http://www.lynda.com/SolidWorks-tutorials/SolidWorks-2014-Essential-Training/143606-2.html)


Professional SolidWorks training: http://solidwize.com/

www.solidprofessor.com/training-plans/solidworks/